
Please find below information on the various icons in the Mapping Tab and their functionality.
Print Preview (top half icon) - This shows a Print Preview of data displaying on the Mapping tab. This will include logos, headings, legends and scale as selected
Print Preview (bottom half icon) - This allows access to other options, including:
Use Printer Ratio - This enables the user to view the Mapping data on screen as it might be when printed, particularly useful when zooming to a specific size
Orientation - This allows the user to swap between Portrait and Landscape, in order to best display the Mapping data
Select - This option allows the user to click and highlight individual components on the mapping screen
Select Multi - Allows selection of multiple paddock polygons
Drag - Allows the user to click on a point on screen and 'drag' to a different location on screen
Zoom All - Adjusts zoom of mapping data to display all polygons
Zoom Layer - Adjusts zoom to display data from the currently selected layer in Layer Manager
Zoom Selected - Enables the user to zoom and display currently selected polygons (hold Ctrl and click on each polygon to select multiple)
Zoom - Allows the user to click at a point on screen to zoom in on that location
Zoom Rectangle - Allows the user to draw a rectangle on screen for magnification (click and hold on top left corner of desired rectangle, drag to bottom right corner and release)
Select All - Selects all polygons on screen
De-Select All - De-selects all polygons on screen
Scale - Adds a scale to the printable version of the Mapping data, size can be adjusted in Mapping Settings
Layer Library - Toggles the Layer Library component of the Mapping tab on or off, this is found in the bottom left corner of the screen and includes layer and project options
Legend - Toggles the Legend on or off on the active mapping screen (displayed on the right hand side) and in the printable Mapping data, this can be moved around screen on the printable version in Mapping Settings
NavMap - Toggles the Nav Map component of the Mapping Tab on or off, this is found in the bottom left corner of the screen
Attributes - Toggles the Attribute component of the Mapping Tab on or off, this is found in the bottom right corner of the screen
GPS - Toggles the GPS component of the Mapping Tab on or off, this is found on the right hand side of the screen
Geo-Referenced Graphic - Allows the user to export (save as a shp file) data from the Mapping tab
Vector Layer - Allows the user to export (save as a shp file) a Layer from the Mapping tab
Vector Layer (Cropped) - Allows the user to export a Cropped Layer (save as shp)
Geo-Reference - This opens a pop-up box in which a user may geo-reference an imported image or object using Easting and Northing points
PASource - Opens a portal to PASource - future development
Mapping Settings
These settings are accessed by clicking on the arrow  in the View section of the Toolbar. These are also available by clicking File > Options > Mapping
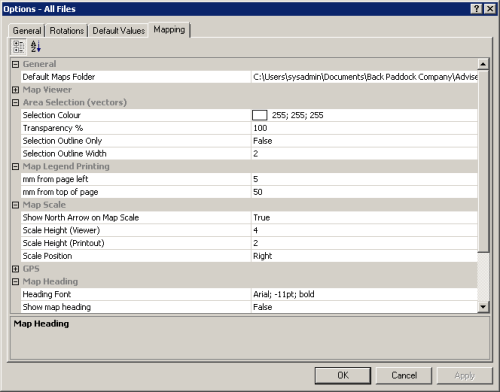
Expand each heading in the pop-up above to see these options
Default Map Folder - Adjust the default maps folder for importing and exporting to and from Adviser
Scroll Bars - Add scroll bars to the Mapping page to allow navigation around the data on screen
Background colour - Adjust the background colour by clicking the ... to the right hand side of this option, and selecting from the colour wheel. Click OK to confirm
Selection Colour - Adjust the colour a polygon turns when it is selected by clicking the ... to the right hand side of this option and selecting from the colour wheel. Click OK to confirm
Transparency - Adjusts the transparency of selected polygons, use the slider to adjust
Selection Outline Only - Adjusts to only colour the outline of a selected polygon rather than the entire polygon
Selection Outline Width - Adjusts the width of the border for selected polygons
mm from page left - Allows the user to set the placement of the legend horizontally, in mm from the left (A4)
mm from top of page - Allows the user to set the placement of the legend vertically, in mm from top of page (A4)
Show North Arrow on Map Scale - User selects True or False
Scale Height (Viewer) - Allows the user to determine the physical size of the scale when seen in the Mapping Tab
Scale Height (Printout) - Allows the user to determine the physical size of the scale when printed
Scale Position - Allows the user to select location of the scale on page
Allows the user to set Com Port, Baud Rate, Decimal Places and Crosshair colour for GPS component of mapping.
Heading Font - Allows the user to select Heading Font for Mapping printouts, the Heading is created from a Mapping Project
Show map heading - Allows the user to toggle the Map Heading on or off
Show logo on map - Allows the user to toggle the logo on or off
Logo position - Allows user to select logo position
Logo Height (mm) - Allows user to determine the size of the logo by manipulating height (mm)
Allows the user to enter username and password for use in PASource - under development