Create Satellite Image in Google Earth
Using Google Earth, we want to create and import a background file into our Adviser program. From there, we will be creating paddock boundaries. The accuracy of these images and the correct alignment of polygons and background imagery depend on user precision matching Reference Points between Google Earth and Adviser, and correct co-ordinate transference. Let’s get going!
Getting Google Earth Ready
To ensure that Google Earth behaves as we require during our Mapping, we need to ensure that the settings are correct. Open the program and ensure that the program is ready by completing steps below:
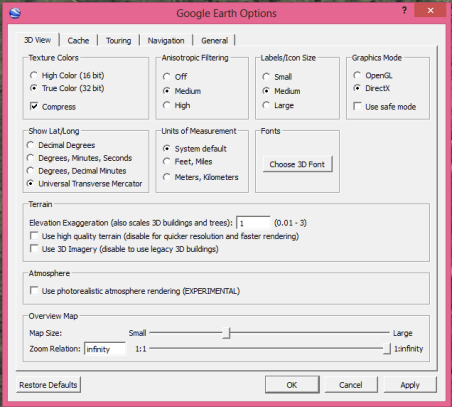
- Left click on Tools from top toolbar
- Left click on Options
- Change “Show Lat/Long” in 3D View tab to Universal Transverse Mercator (shown above)
- Click OK
- Left click on View from top toolbar
- Ensure that Tour Guide is not ticked, Left Click to untick if required
Find your Farm
Google Earth is all fired up and ready to go! First, we need to find the area that you want to map. Use the search function of Google Earth, or keep zooming until you find your location.
- Zoom in as much as possible so whole farm is on screen
Establish co-ordinates from Google Earth
These will be used to geo-reference your map within the Adviser program.
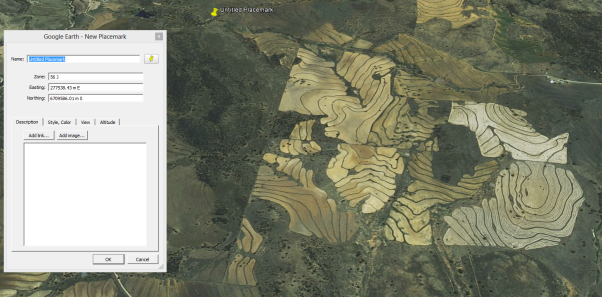
- Right click under Places on left
- Left click Add
- Left click Placemark
- Move Placemark to a clear point on or near top left corner of your farm- Reference Point 1
- Make this a place that you can find on the map again, for example, a distinctive tree or shed. The object here is to get two reference points as far from each other as possible, both horizontally and vertically
- Zoom in as much as possible for accuracy
- Record Easting and Northing (will be shown as Southing in Google Earth) points, with the title Reference Point 1 including all decimal points
- For example: Reference Point 1: Easting= 262884.36, Northing = 6694673.35
- Zoom in as much as possible for accuracy
- Record Zone information
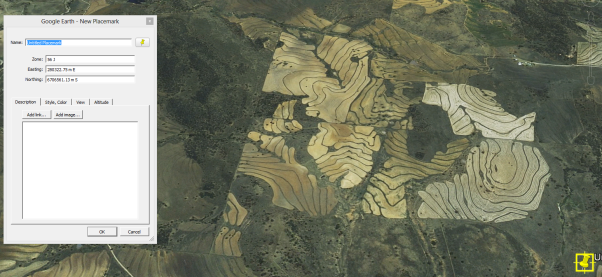
- Move Placemark to a clear point on or near the bottom right corner of your farm, Reference Point 2
- Record Easting and Northing points, with the title Reference Point 2 including all decimal points
- For example: Reference Point 2: Easting = 263919.33, Northing = 6693606.15
- Record Zone information if different from initial
- Click Cancel on Placemark
We are now ready to save this background image. Snipping Tool can be used for this, or the image can be saved through Google Earth.
Output image from Google Earth
Image can be saved in a multitude of different ways. A couple of these are listed below for your convenience.
Use Snipping Tool to save image
“Snipping Tool” is a program that will be found on most computers, and allows the user to take a cropped picture of their screen to save.
- Open “Snipping Tool”
- Click Start Menu
- Type in “Snipping”
- Double click on program to open
- Click “New” in Snipping Tool
- Ensuring that entire farm and Reference Points are contained, draw rectangle around required area
- When Snip opens, check that area is complete
- Click File
- Click Save As
- Ensure file type JPEG or BMP
- Choose location for “Background image”
- Suggested: Documents\Back Paddock Company\Adviser\Maps
- Type in appropriate name for image
- For example, Background Farm1
- Click Save
Save through Google Earth
This image can be saved through your Google Earth program by following the steps below:
- Left click on File
- Left click on Save
- Left click on Save Image
- Choose location for “Background image”
- Suggested: Documents\Back Paddock Company\Adviser\Maps
- Type in appropriate name for image
- For example, Background Farm1
- Click Save
We’re ready to bring this into our Adviser program now. Follow these instructions to import the satellite image and draw paddock polygons.